To get creative with our lettering, first we have to understand the basics.
Yesterday we created samples of our natural handwriting. This serves two purposes, to give us a starting point to look back at, and to allow us to analyze our natural tendencies. I asked you to make your samples without over thinking or forcing your hand.
Today we get back to the very basic foundations.
All the letters are formed from similar shapes, combined in different order. We can pick out those pieces and practice them to refine our handwriting. This repetitive practice also helps to add rhythm to our penmanship.
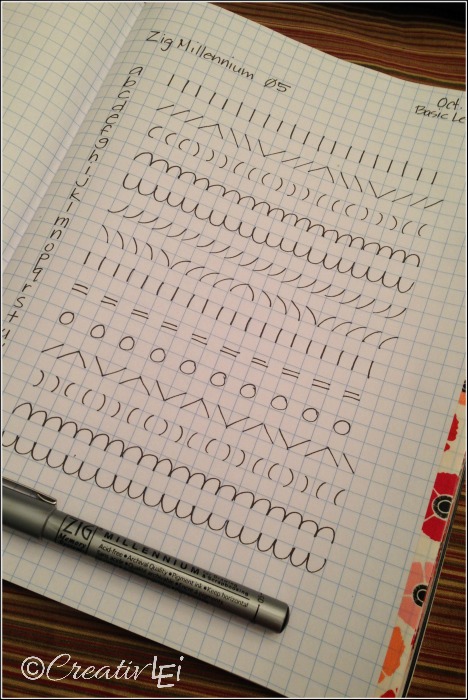
On a new page I wrote out the alphabet down the left side. I noted which pen I was using at the top of the page. One letter in each square. Look down at each letter and you’ll see straight lines, curves, diagonals, circles, hills, and valleys.
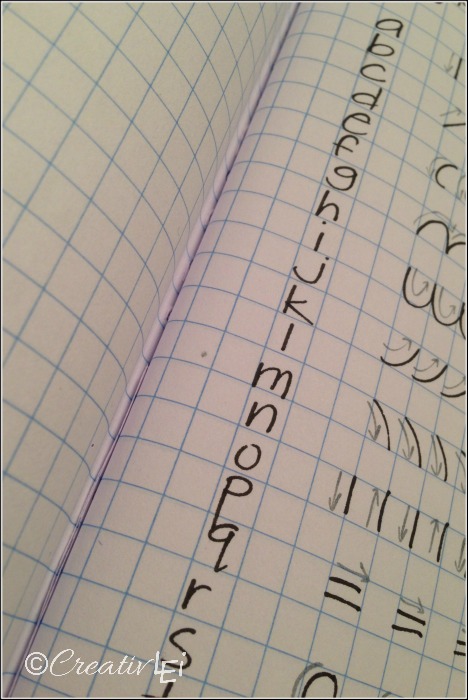
We’re going to create a line of each shape or letter fragment.
It’s important to notice the direction of the stroke. It doesn’t show in ‘regular’ pen, but when we use other style pens later in the month, the direction of the stroke will matter a great deal, so lets practice it now. The proper stroke direction also helps create a fluid rhythm in you lettering.
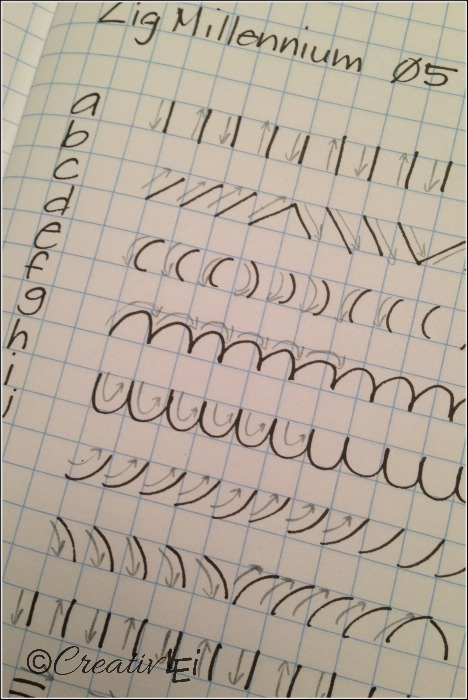
I’ve included arrows in my sample for you to see which direction I was moving in.
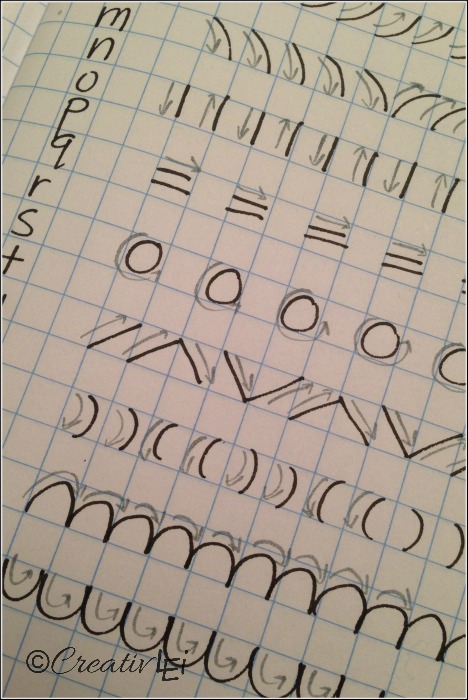
If there is a line of shapes that seems tricky, repeat that line.
Fill the page, or use two. I know this seems like very basic, almost silly practice, but drills like this will also start to give you ideas for borders and dividing lines to use in lettered pieces, later on.
Here is my demonstration of this exercise:
Don’t worry if it doesn’t look perfect, it’s an exercise to build consistency and muscle memory.
Which stroke feels the most awkward? Did repeating it help it to feel more comfortable?
You all are doing great. I’ve been checking out the hashtag (#loveyourlettering) and I really enjoy peeking at your work!

Is there not a print out of the basic letter forms to practice? Guess I don’t completely understand the exercise. Thanks!
Hi Terrie, it wasn’t my intention to add a printable for this lesson, because I was trying to prompt you all to look at letters and see the pieces that are common between them and pull out those shapes for practice. I’m away from home, but maybe when I return I can think further on a printable. Thanks for your input. 🙂
It would be wonderful if you could add a print too pdf button as having pdfs of your lessons would be great for my lifestyle which is away from the internet quite a lot. Thanks so much for your time and effort, your teachings have been the only ones that have helped me improve my everyday handwriting xxx
Thank you for your suggestion. In the near future there will be an ebook counterpart to the series. 😉
Repeating the tricky line really did help! Really looking forward to this month 🙂
It is good to get back to basics
Really enjoy getting back into lettering. Use to do calligraphy years ago but I guess time got in the way and just stopped.
Thanks for doing this, maybe I can get back into the swing of lettering again and keep it up this time.
Didn’t get today’s lesson in my email but I was glad to find it here today.
Thanks, Debi, it’s great to have you here. We’re catching up today and will be back to new assignments tomorrow.
I signed up for this series, I got the first two posts, but this one didn’t come to my inbox. Wondering what happened?
Hi Trish, we’ll be back to new assignments tomorrow. There was a glitch with my scheduled post yesterday and we’ve had lots of new people join us this weekend, so we’re using today to catch up. Thanks so much for your patience.
Is today’s lesson review (Oct.4th)? I cant seem to find it. I’m loving this class!
I got yesterday’s lesson in my email this am? Will we get today’s lesson sometime today? Thanks! Enjoying this class. Look for my emails every am and didn’t get one yesterday. 😊
Hi Amanda, I’m sorry the post I scheduled yesterday didn’t go live as scheduled and missed the time of the daily email. We’ll be back to new assignments tomorrow.
Today’s email, dated October 4 is yesterday’s post (October 3). According to your lesson plan, today is supposed to be Refining Your Handwriting. Catch you later.
Thanks, Patricia. Yesterday’s scheduled post went live later than it was supposed to. We’re using today as a catch-up day. Thanks for your patience,, we’ll be back to new assignments tomorrow.
I am new to lettering and enjoying it.
what an amazing tutorial!
Just starting . . . on the “humps” (the fourth and fifth lines) do you pick up your pen at the bottom or top of each “hump” or should it flow all across the page?
thank you SO SO MUCH
Denise, Arcata CA
Hi Denise, so glad you’ve found me. I’m currently developing guide sheets to help out with those who want some deeper instruction, but those won’t be ready until the new year. For the humps, and such, while I’m practicing I do each one individually. It helps me to focus on correctly forming each part. Hope that helps a bit.
So I just started doing this and I’m real excited about it. I was hoping there would be a video for this one but I don’t see a link to one. (I’m on my phone). What letter is associated with the stroke next to your letter “e”? Mine keeps looking like a full fledged “c” but yours seems more “(“. I can’t figure out what that would correspond to other than the top of an “s”? Maybe the tail of a lower case “q”? Thx
Hi Kate, I didn’t realize I hadn’t filmed a video for this. I’ll try to do that soon! As for the (), they are strokes I use in cursive writing, for the l, k, h, etc. Definitely a little different than the c shape. So glad you’ve joined! Let me know if I can help with any other explanations!
I’ve never done this, I LOVE IT!!! Our church ladies get together for a “craft night” every other week, but most of us doing adult coloring books. I can’t wait to show them THIS!!! They are all going to want to do it!! Thank you! 🙂
I’m so glad you found me and can share this with others. I hope it will be a blessing.
Hello! I’m doing this challenge now and am not sure of the instructions for this day’s lessons. Is there a video that gives more instruction? Thank you!
Hi Sheila. Thanks for joining. I don’t have a video for this post (yet). I am gearing up for another round of live demos to coordinate with the series, starting March 1st. I’ll be sure to video this challenge. I do hope you’ll check back then. This lesson should be covered on March 3. Thanks for your interest and your patience.
Thank you! I will definitely be on the look out. 🙂
Hi, Lisa. You mentioned up higher in the comments that you were working on guide sheets. How are those coming along? 😉
So far my worst lines are the ( and ) lines. I just read your explanation to Kate so I’m going to tackle them again. Oh, and I wasn’t lifting my pen at the end of each hill and valley, so must go back to those as well.
I could have sworn I saw a video for this lesson on the Katch site. Will look again.
Thanks very much for making this series available!
Hi Barbara. With the shut down of Katch, I’m prioritizing the guide sheets and am very hopeful to release them at the end of the month. This summer I will film the demo videos for the series for more concise videos to embed in the lessons. It’s just taking a bit of time since it seems everything happened at the same time as our move. Thanks for being here!